
Odoo KSeF: Features, Limitations, and Supported Versions?
As of Friday evening, January 30, 2026, the KSeF integration module has been officially deployed to Odoo. It is currently available for Odoo Community (versions 18.0 and 19.0), and will be available for the Enterprise edition within a few days (following an automatic server update).
The module provides core functionality: sending sales invoices directly to the KSeF system. To use it, a brief configuration is required, which I will outline below.
The module does not currently support downloading purchase invoices from KSeF into Odoo (Update Feb 20 , 2026: This feature is ready - Odoo automatically downloads Invoices from KSeF.). For now, you must download invoices from the KSeF portal manually and upload them to Odoo.
Version Support: Available only for versions 18.0 and 19.0.
If you are on an older version (e.g., 12.0+), you must migrate your database to use this module. Adapt IT specializes in Odoo Community migrations.
How to Install and Configure the KSeF Module in Odoo?
If your Odoo instance is set to the Polish localization, the module should install automatically. If not, search for "l10n_pl_edi" in the Apps menu (remember to remove the default "Apps" filter to see technical modules).
Generating Certificates and Keys in KSeF
Always perform these steps in a test environment and on a duplicate database first.
If you need assistance, contact us for a professional implementation.
In this article, I am performing the configuration in the KSeF test environment. I am assuming the basic, simplest scenario—the so-called "happy path."
To enable KSeF to work with any external software, you must generate a certificate. Therefore, the first step is to visit the KSeF website.
KSeF Test Environment Address: https://ap-test.ksef.mf.gov.pl
You need to access this site and log in (ideally using your Tax ID/NIP—although this environment does not strictly verify identity).
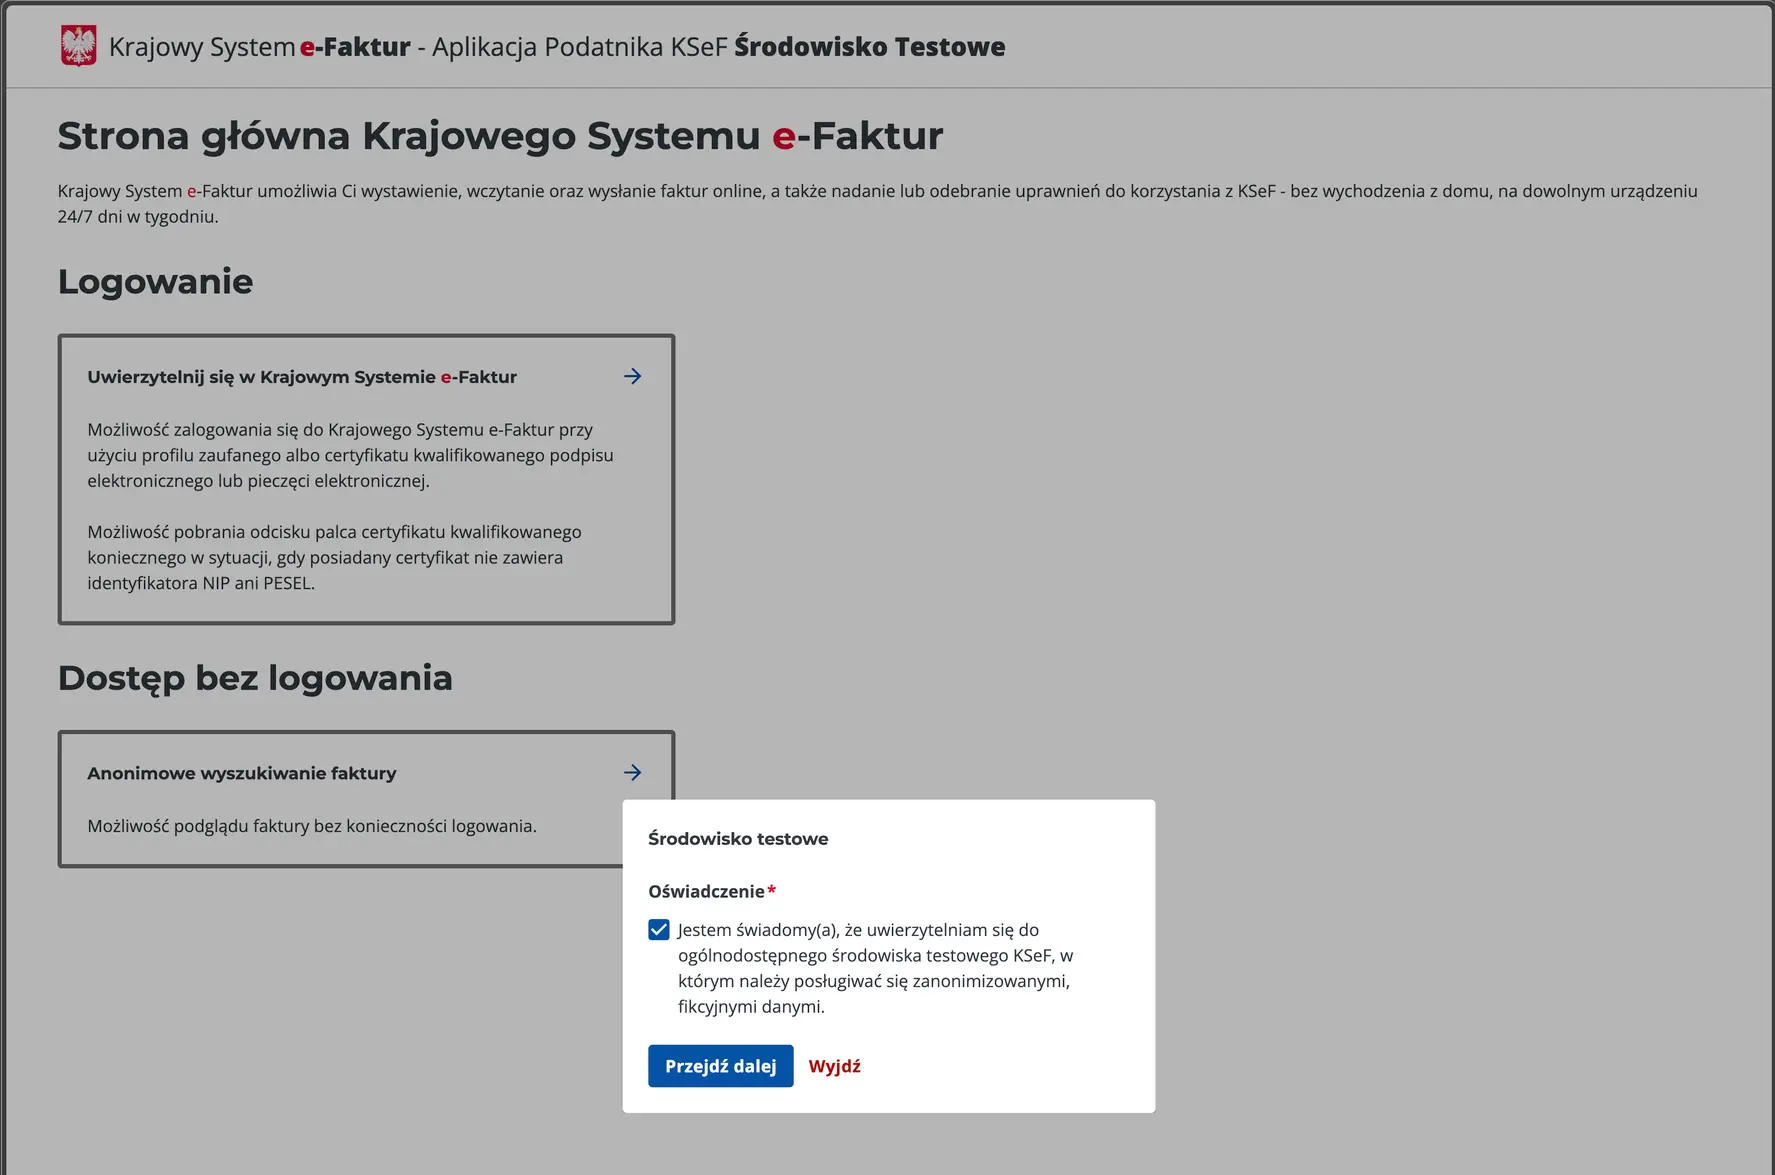
Image 1. Logging into KSeF in the test environment.
Select "Authenticate with the National e-Invoice System" (Uwierzytelnij się w Krajowym Systemie e-Faktur), then click "Next".
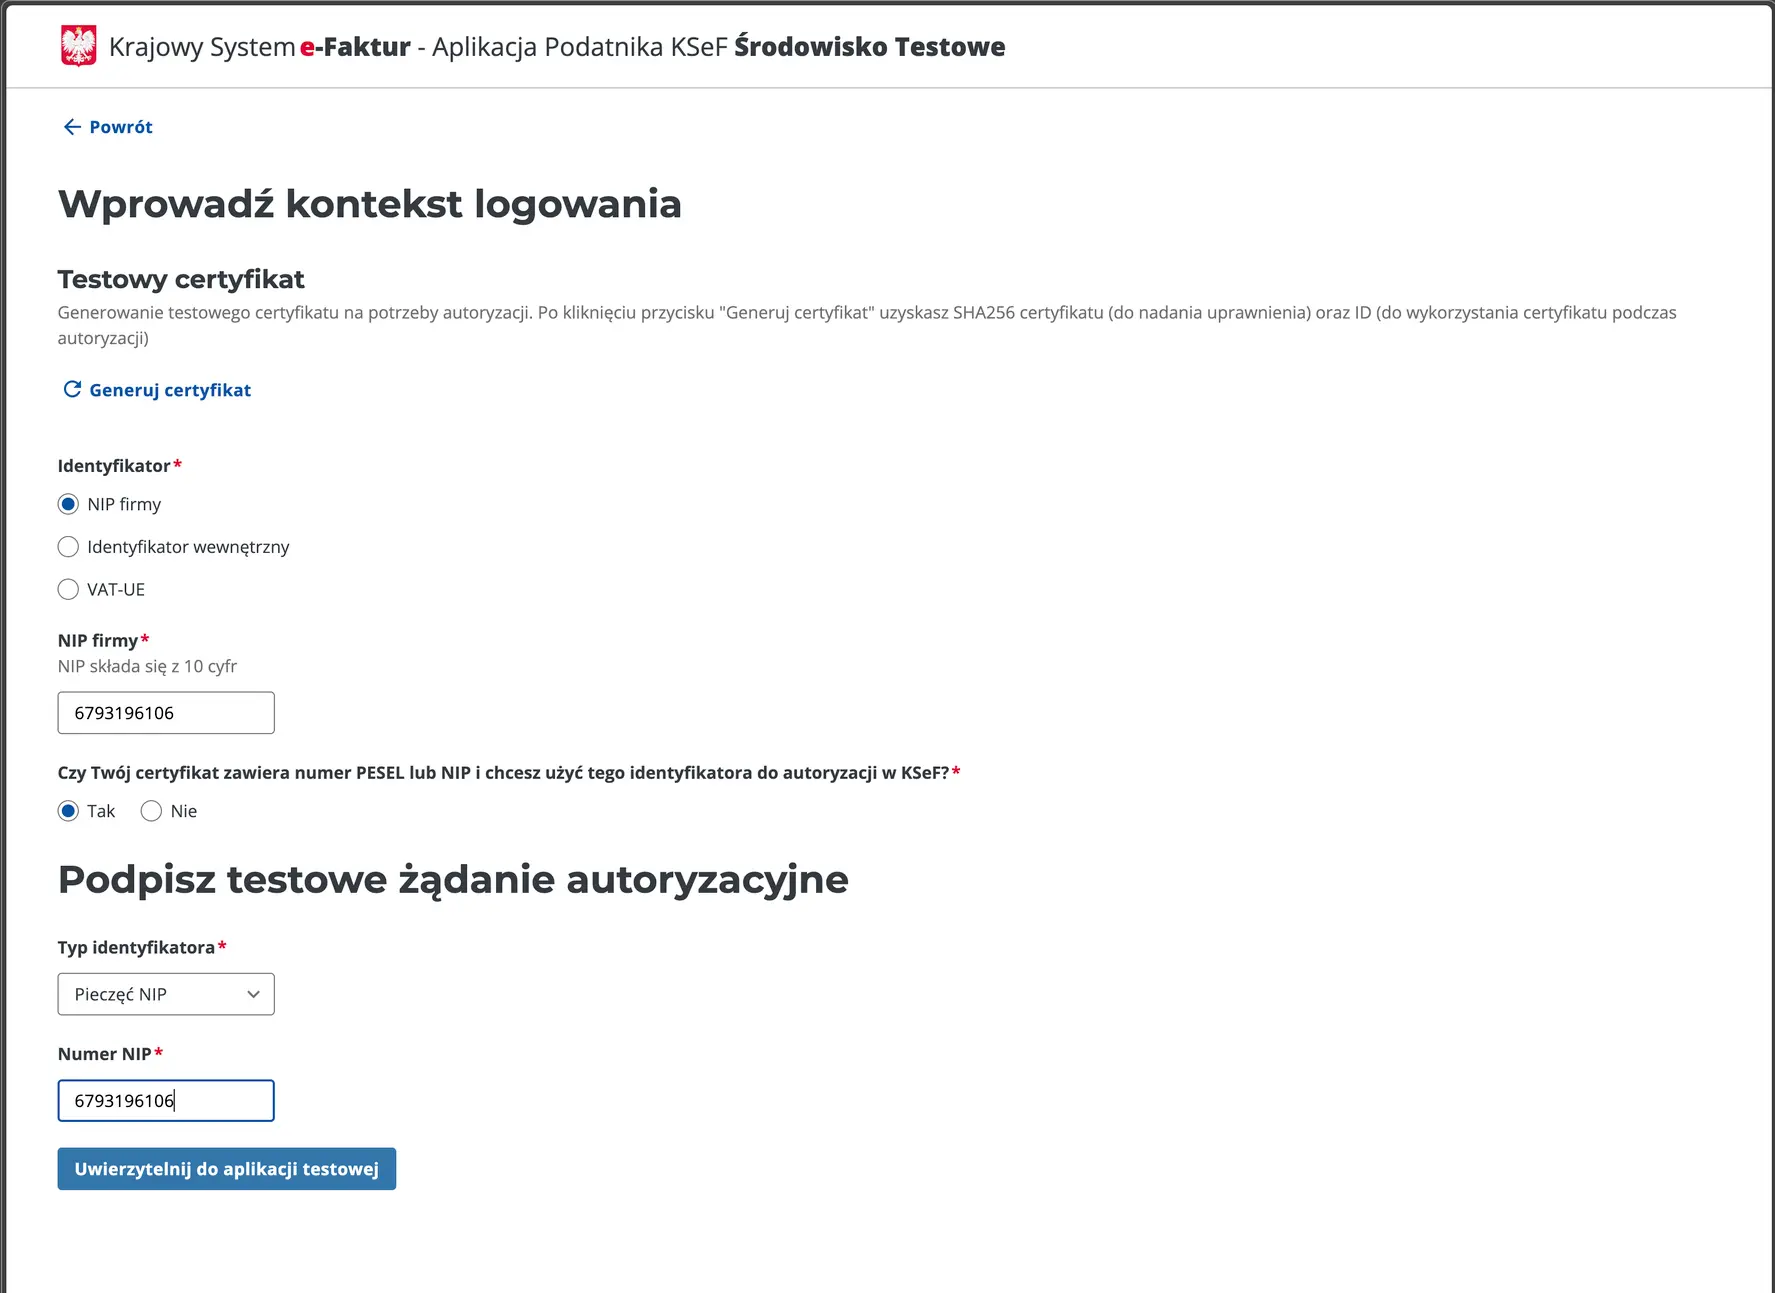
Image 2. KSeF login form.
Enter your Tax ID (NIP) (you may also use a different one).
The two screenshots above show the login process for KSeF. Once logged in, we must generate a certificate. Navigate to Certificates > Request a Certificate (Certyfikaty > Wnioskuj o certyfikat).
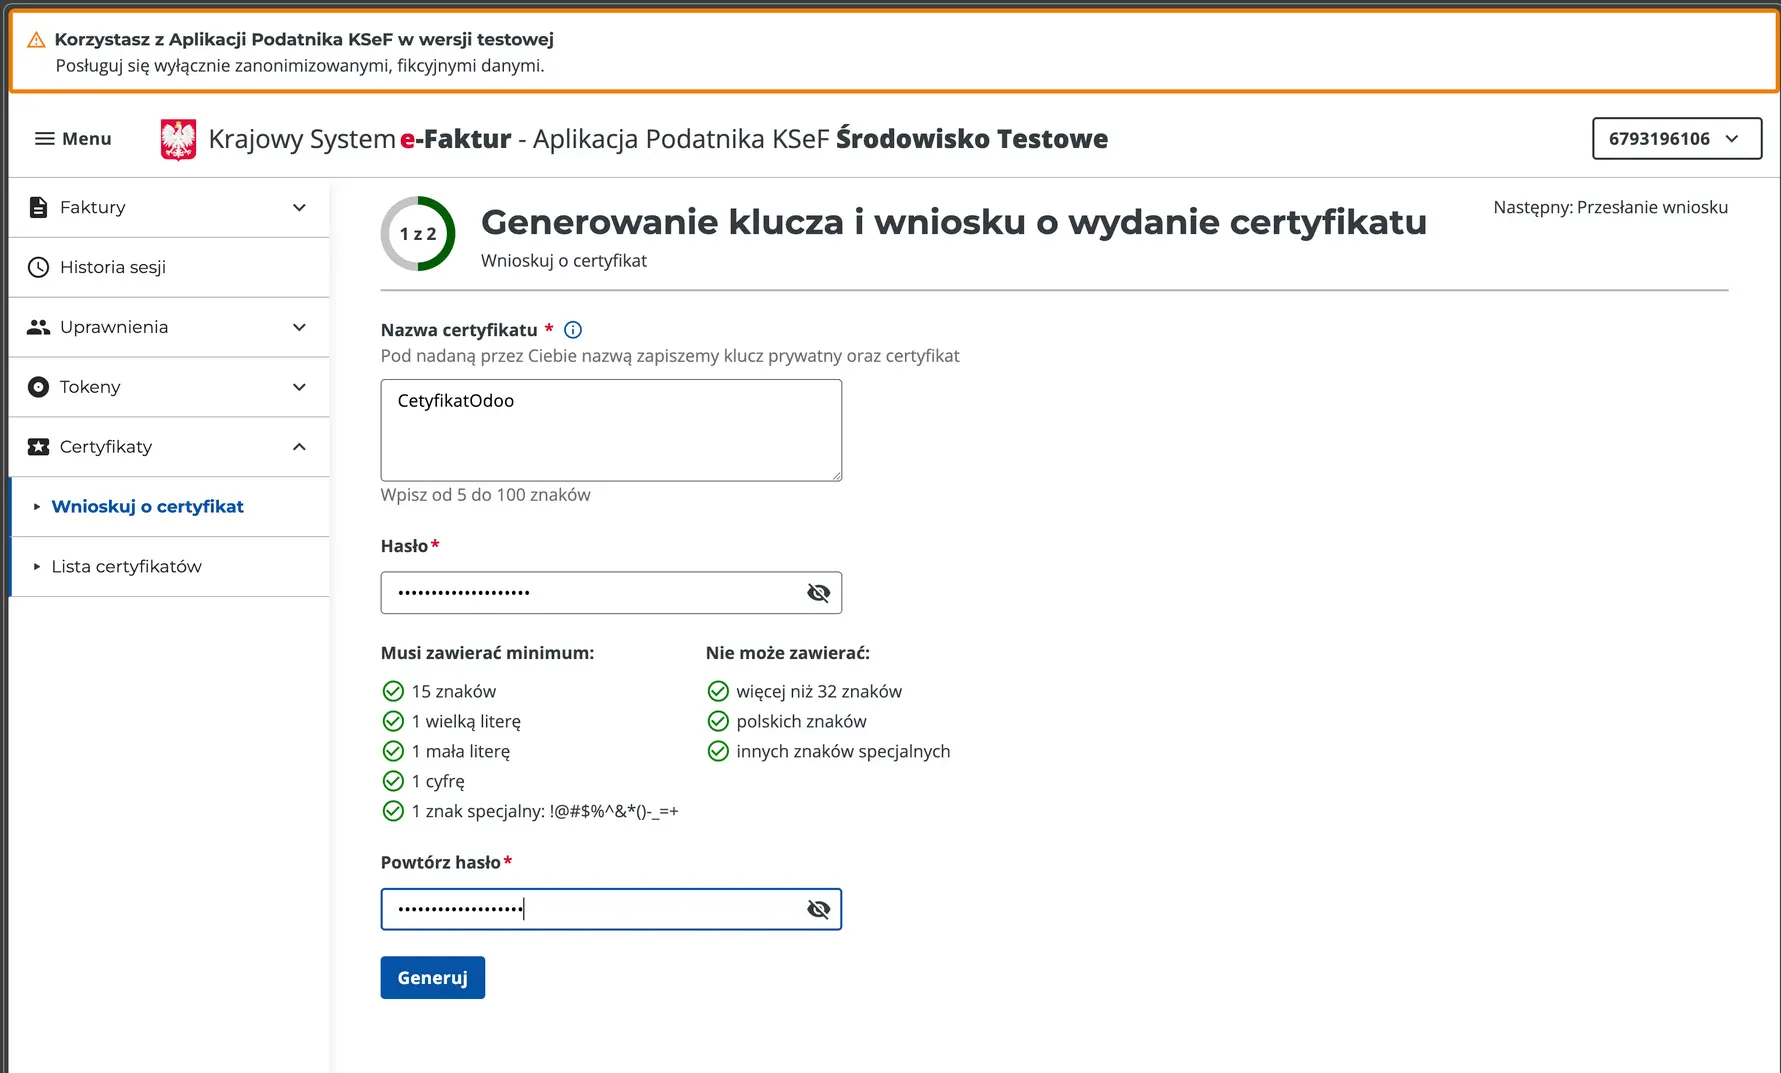
Image 3. Generating a certificate in KSeF – Settings.
Provide a certificate name that will help you associate it with Odoo. Enter a strong password and click "Generate".
After clicking "Generate," a private key will be generated and downloaded. Do not give anyone access to this key. Now, proceed by selecting the appropriate options:
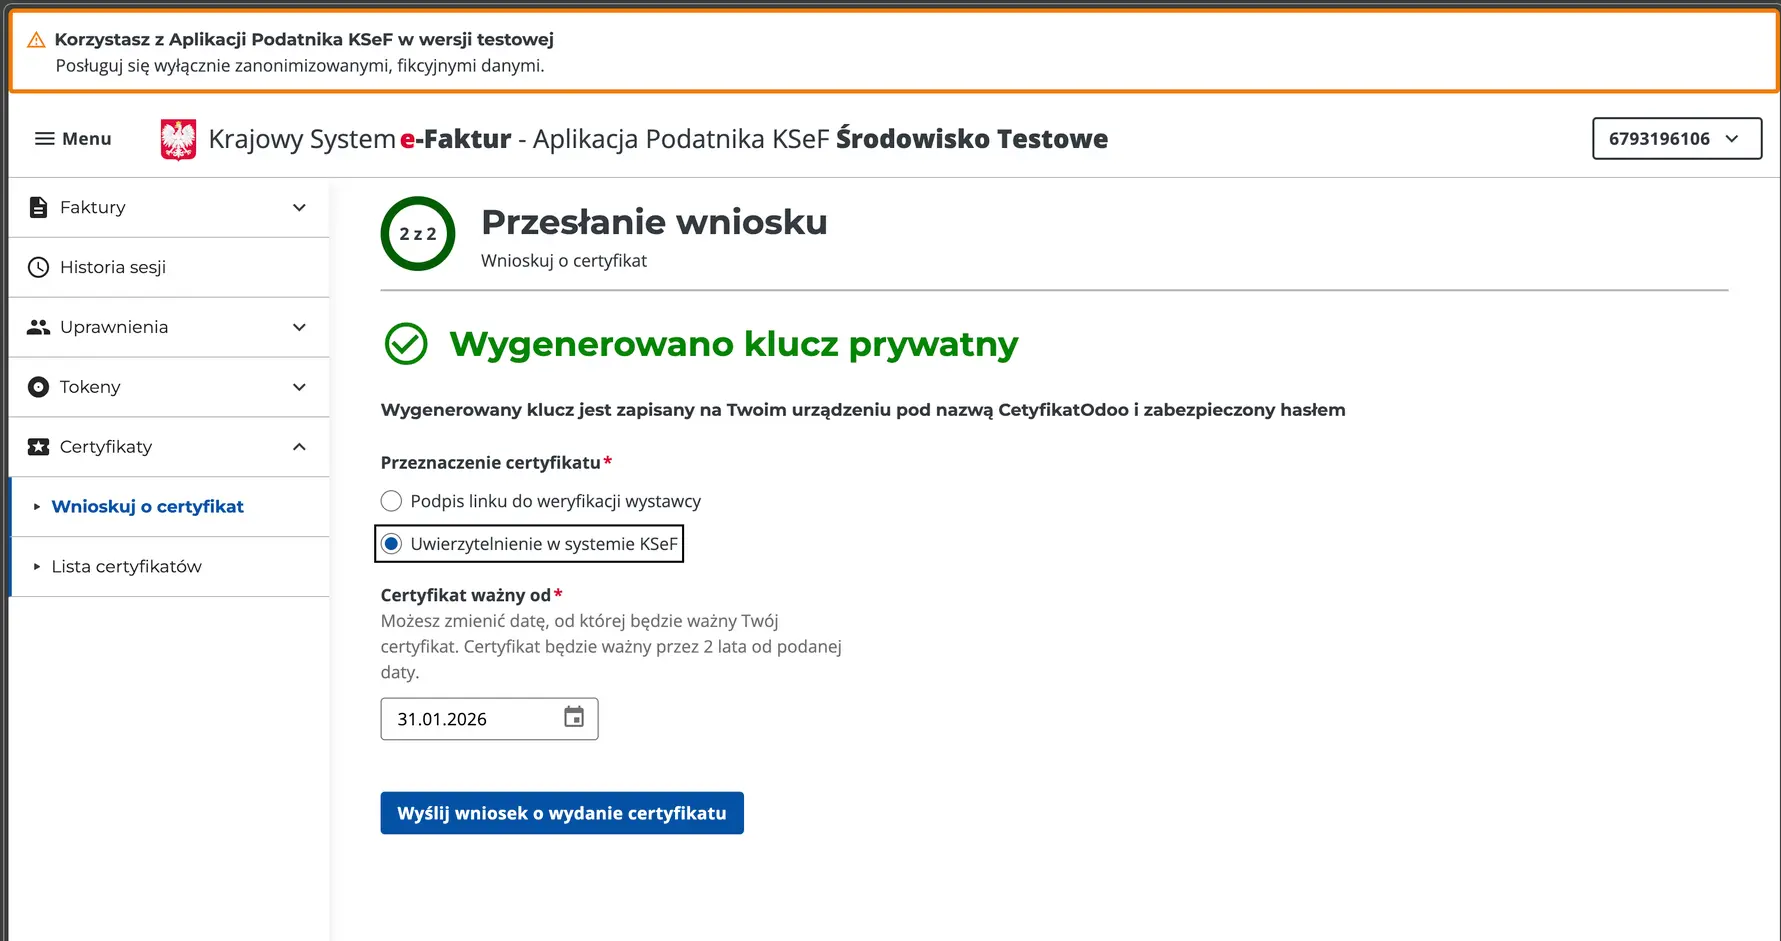
Image 4. Certificate Generation in KSeF – Request for certificate issuance.
Click "Send request for certificate issuance" (Wyślij wniosek o wydanie certyfikatu). After a brief wait and a page refresh, the certificate file will be downloaded.
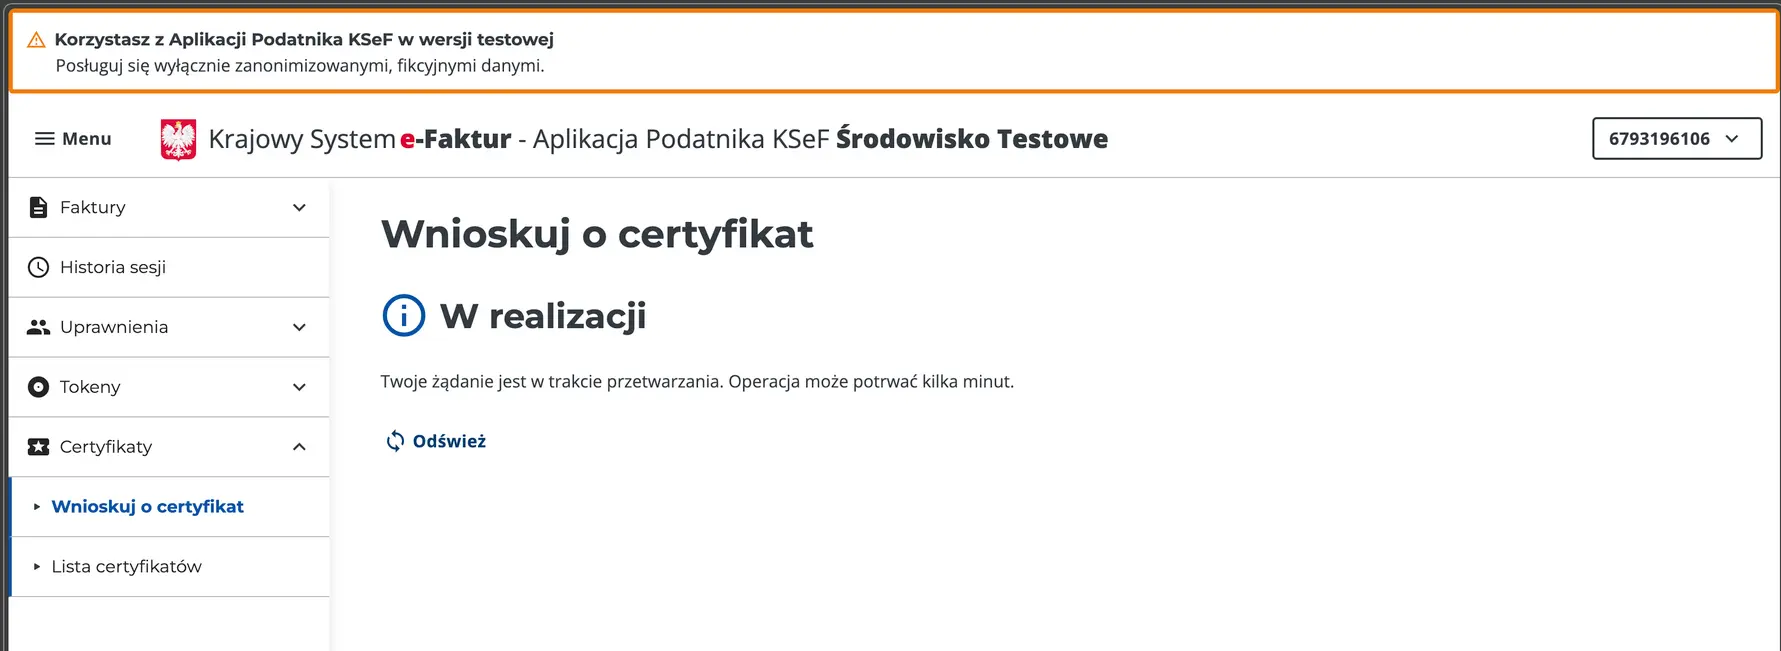
Image 5. Waiting for KSeF certificate issuance.
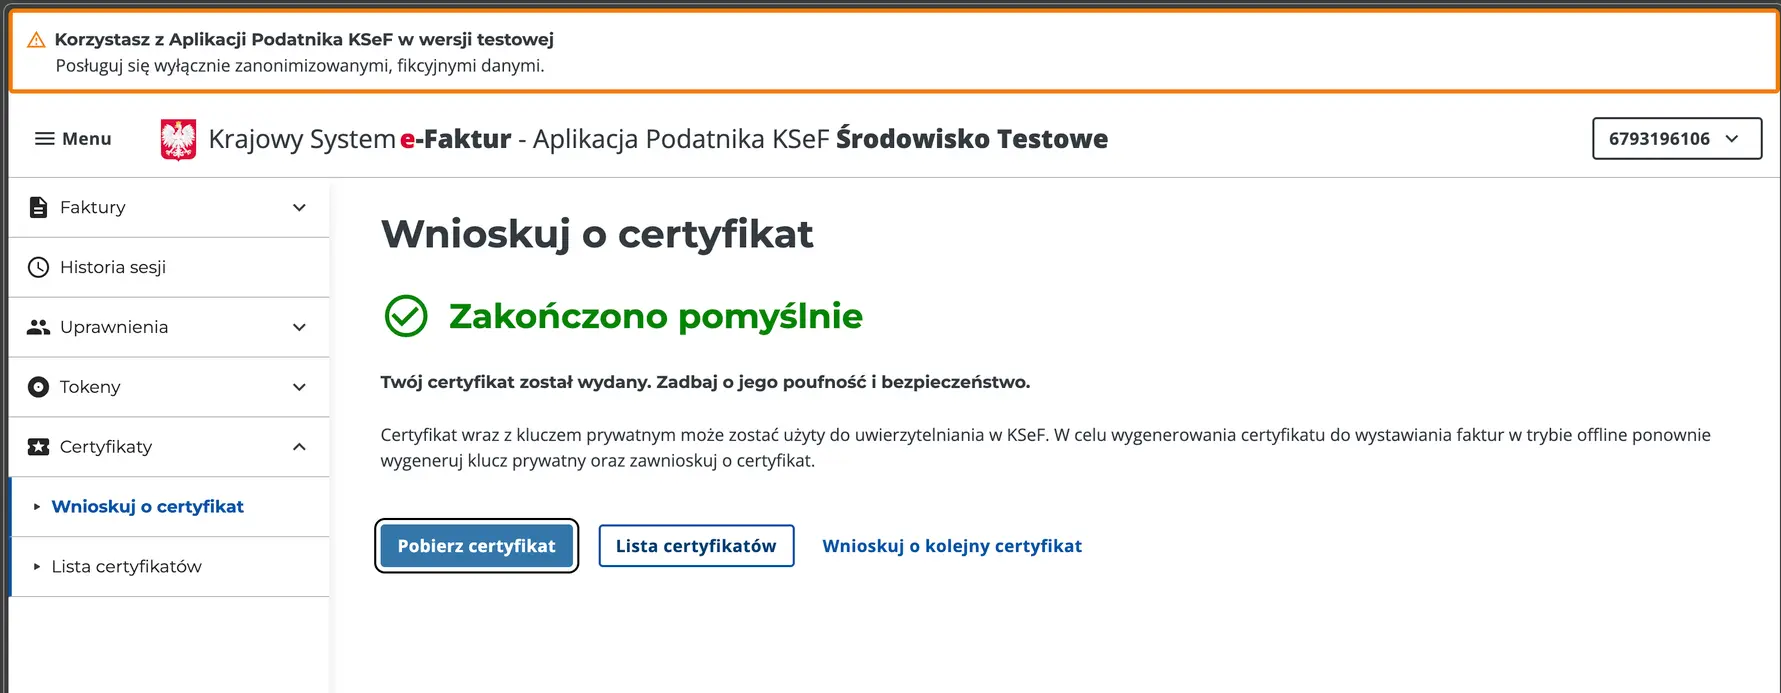
Image 6. View of successful certificate issuance.
If you have completed all the steps, you should now have two files saved on your drive: the certificate and the key. This concludes the certificate creation stage in KSeF; now, we need to configure the module in Odoo.
Configuring the KSeF Module in Odoo
With the certificate and key ready, we can move to the Odoo configuration. This can be done in several ways, but I recommend preparing the key and certificate settings first before enabling the module. I will demonstrate this specific method.
First, verify that your Tax ID (NIP) in the settings is in the format PLXXXXXXXXXX. To do this, go to Settings > Companies > Update Info. The NIP field should look like this:
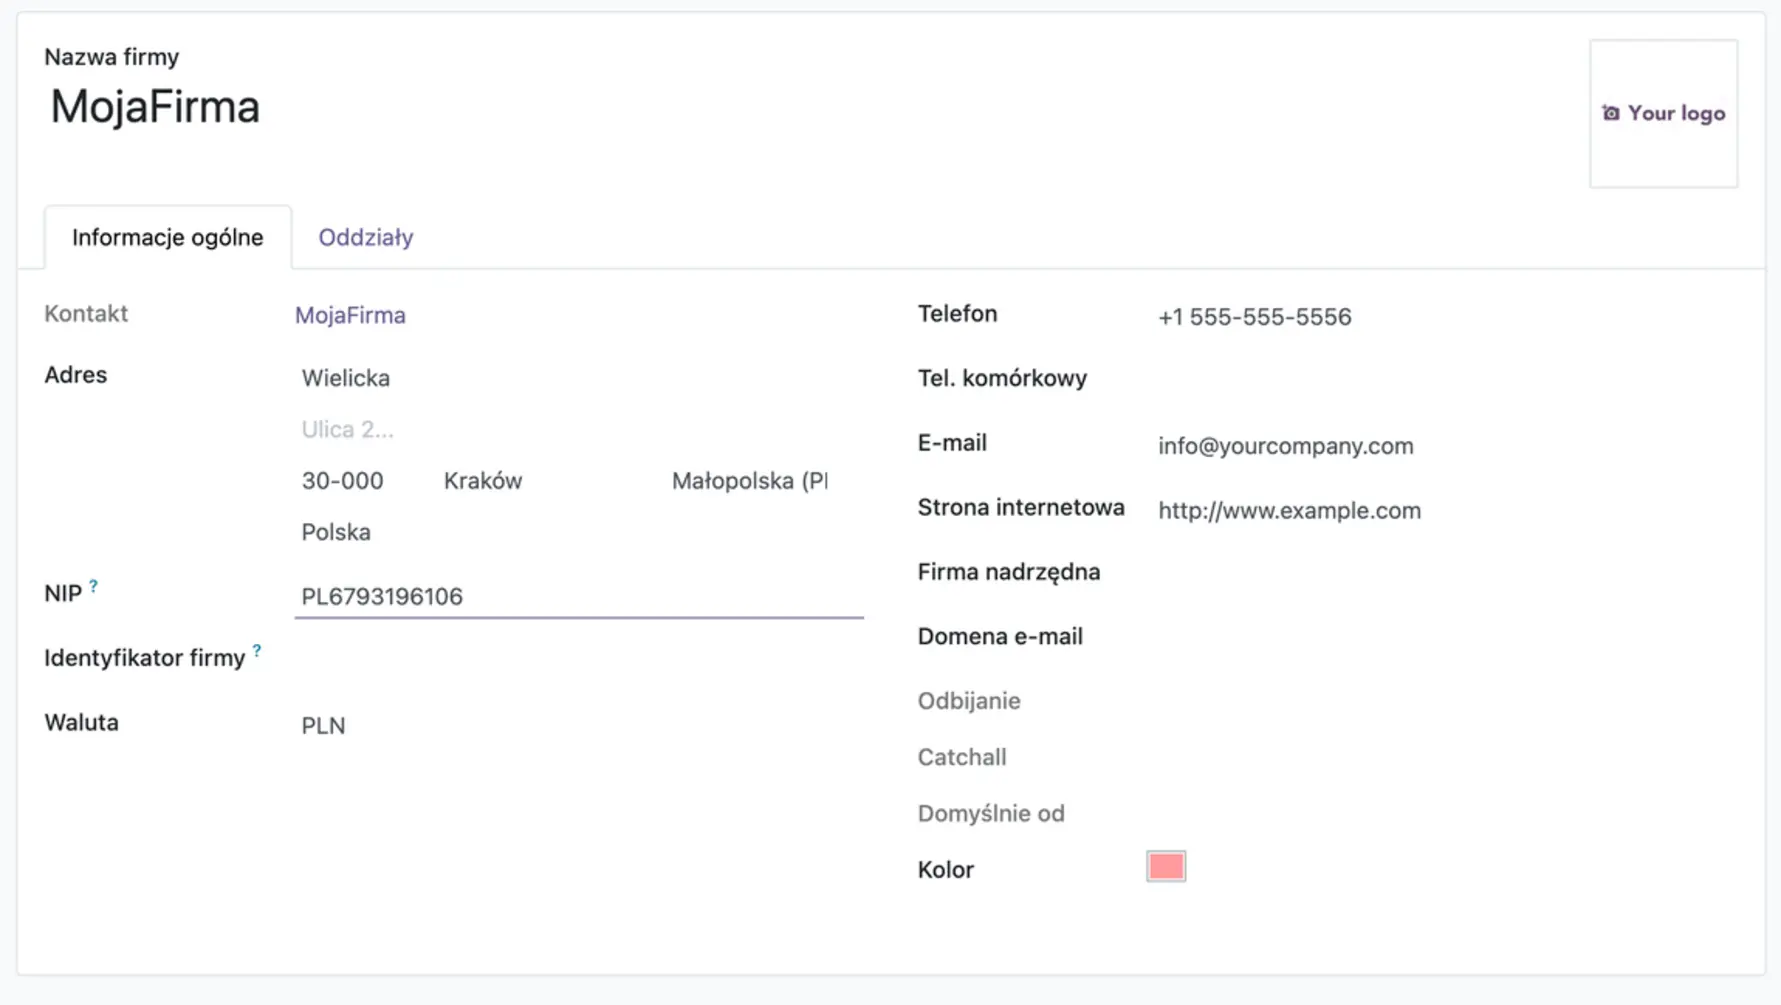
Image 7. NIP setting in Odoo. If you do not have the "PL" prefix in your NIP, the Odoo KSeF configuration will fail.
Key and Certificate Settings
Go to Settings > General Settings > Certificates and Keys.
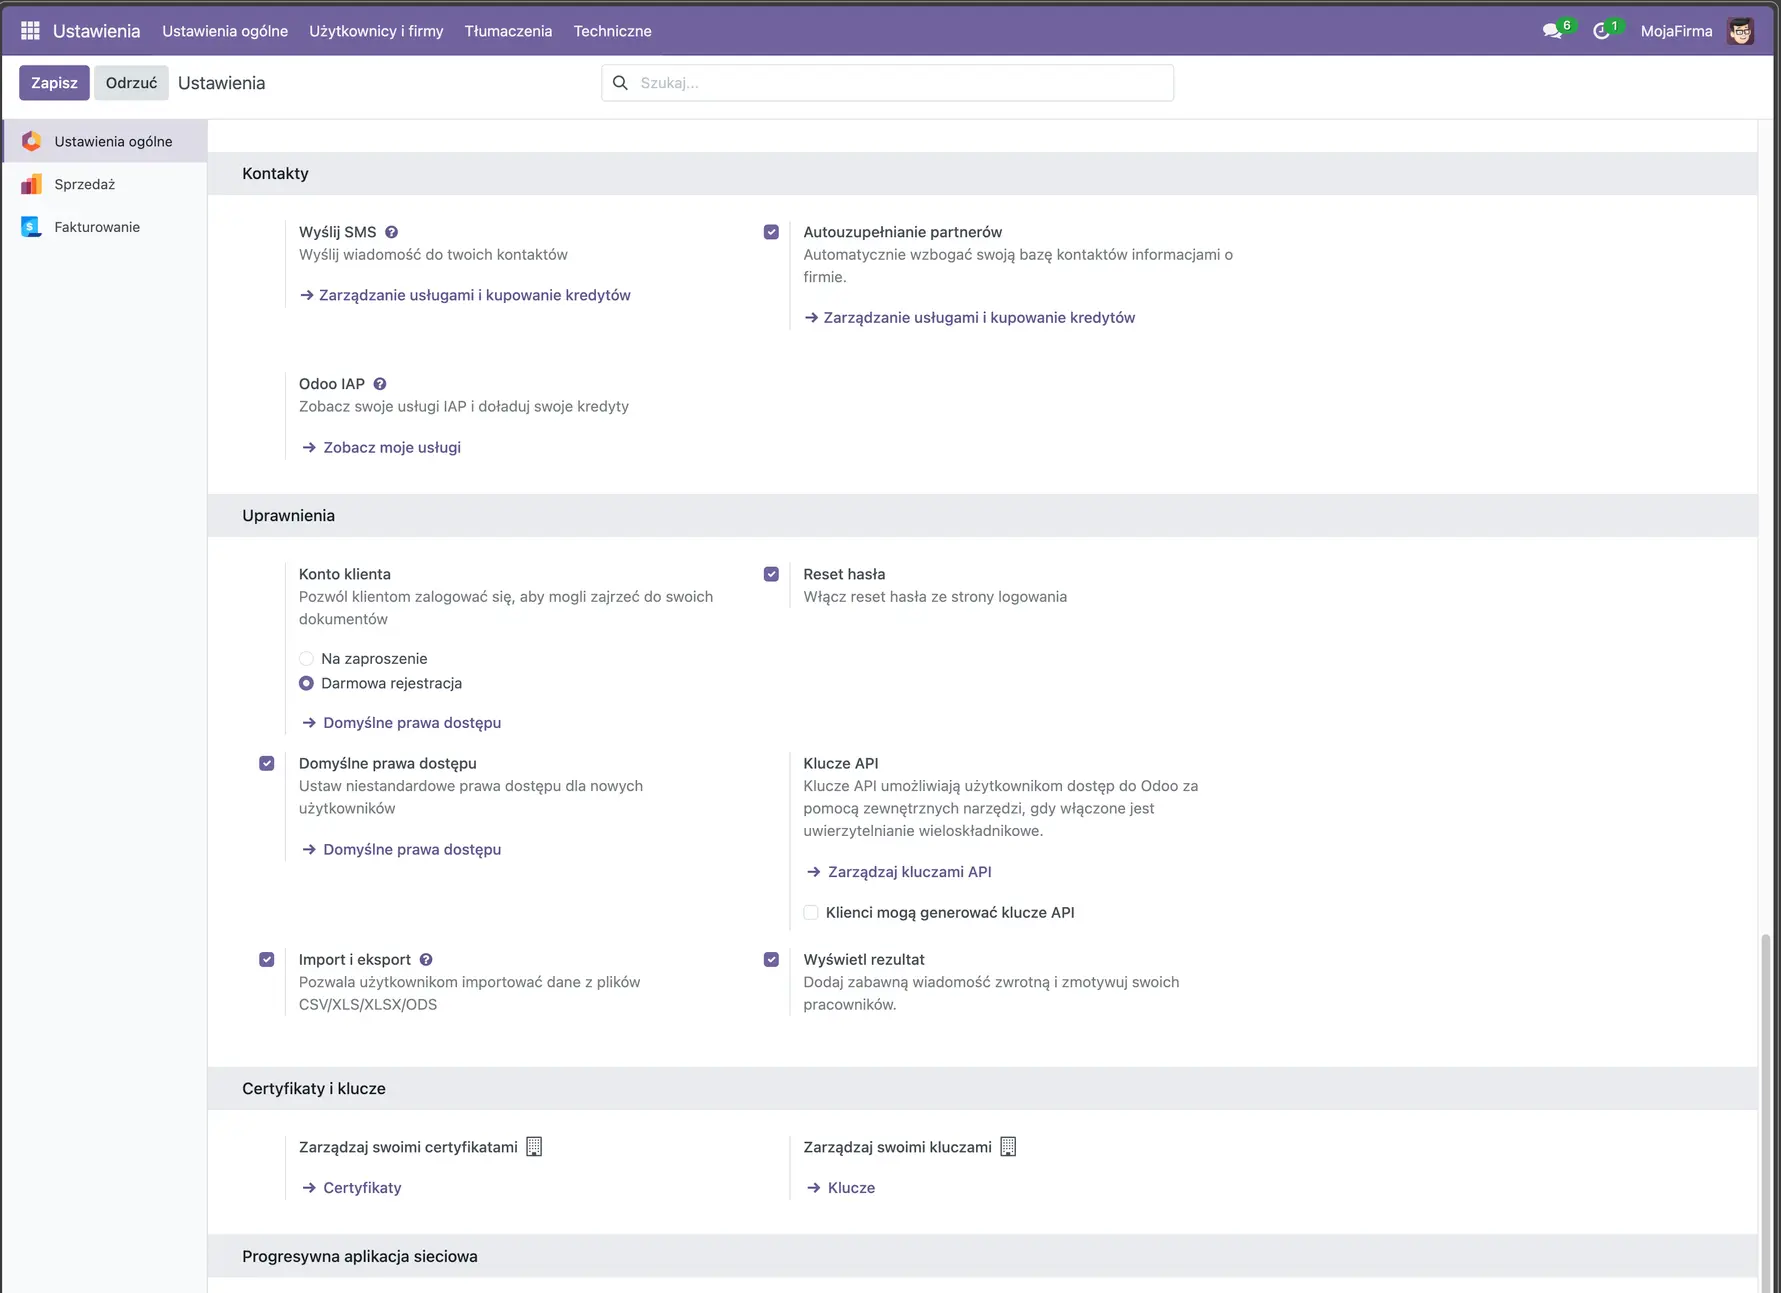
Image 8. Private key and certificate configuration in Odoo.
At the very bottom of Image 8, you can see the configuration fields we are interested in. First, let's add the key – click "-> Keys". A configuration form should open. Add the key file you downloaded from KSeF (the file ending in .key). Then, enter the key password (the one you provided in KSeF). After configuration, you should see a screen similar to this:
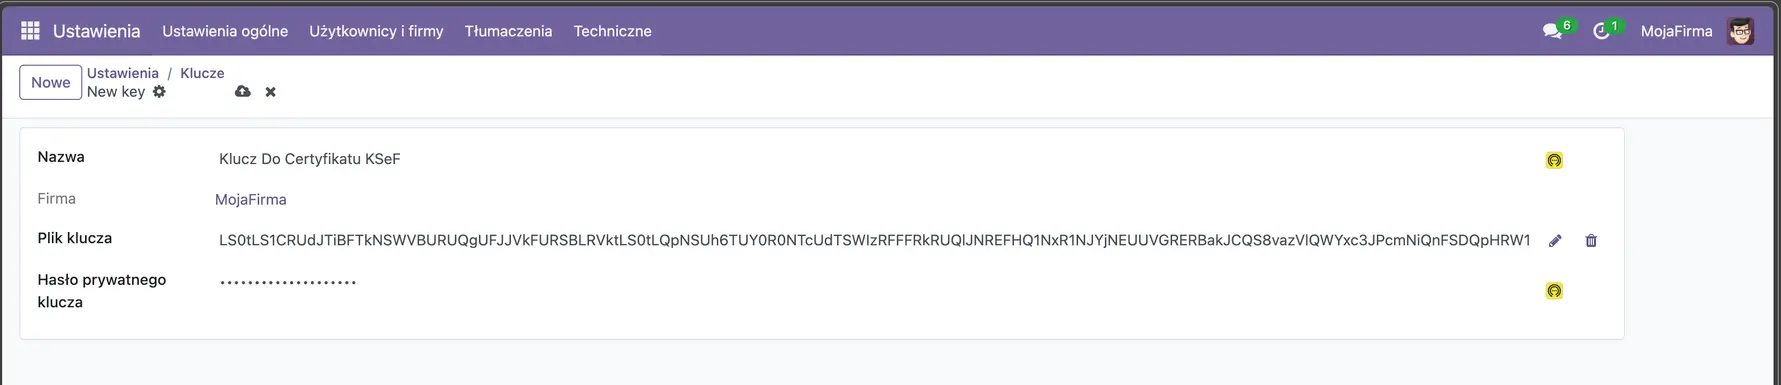
Image 9. KSeF Private Key configuration in Odoo – view after configuration.
Save this key, then use the breadcrumb navigation menu to return to settings and go to Certificates. Fill in the Certificate form fields: Name, Certificate (add the file downloaded from KSeF, the one ending in .cert).
In the Private Key field, select the private key you just created from the list.
After configuration, you should see a screen similar to this:
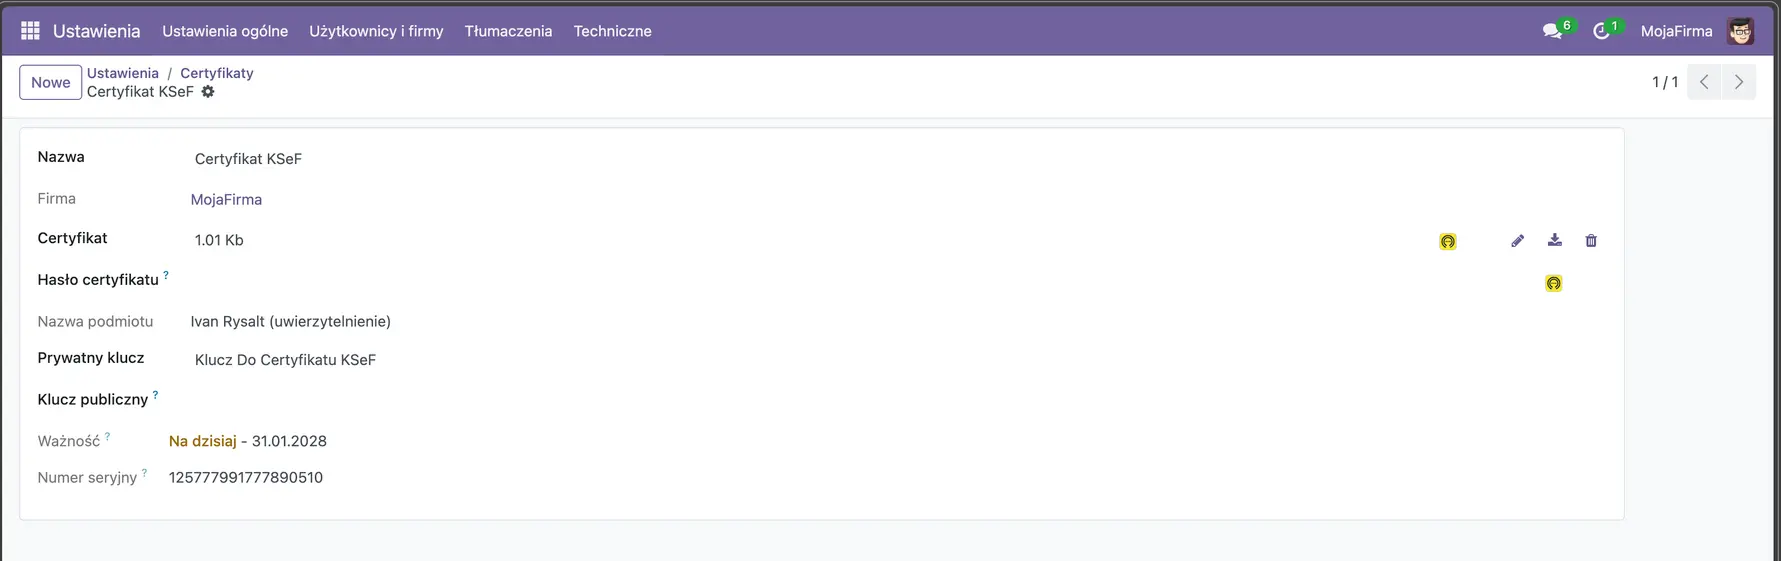
Image 10. View of the Certificate configuration for KSeF in Odoo.
After configuring the key and certificate, we only need to do one more thing: enable invoice sending to KSeF. This option can be found in Settings > Invoicing/Accounting (depending on which module you are using).
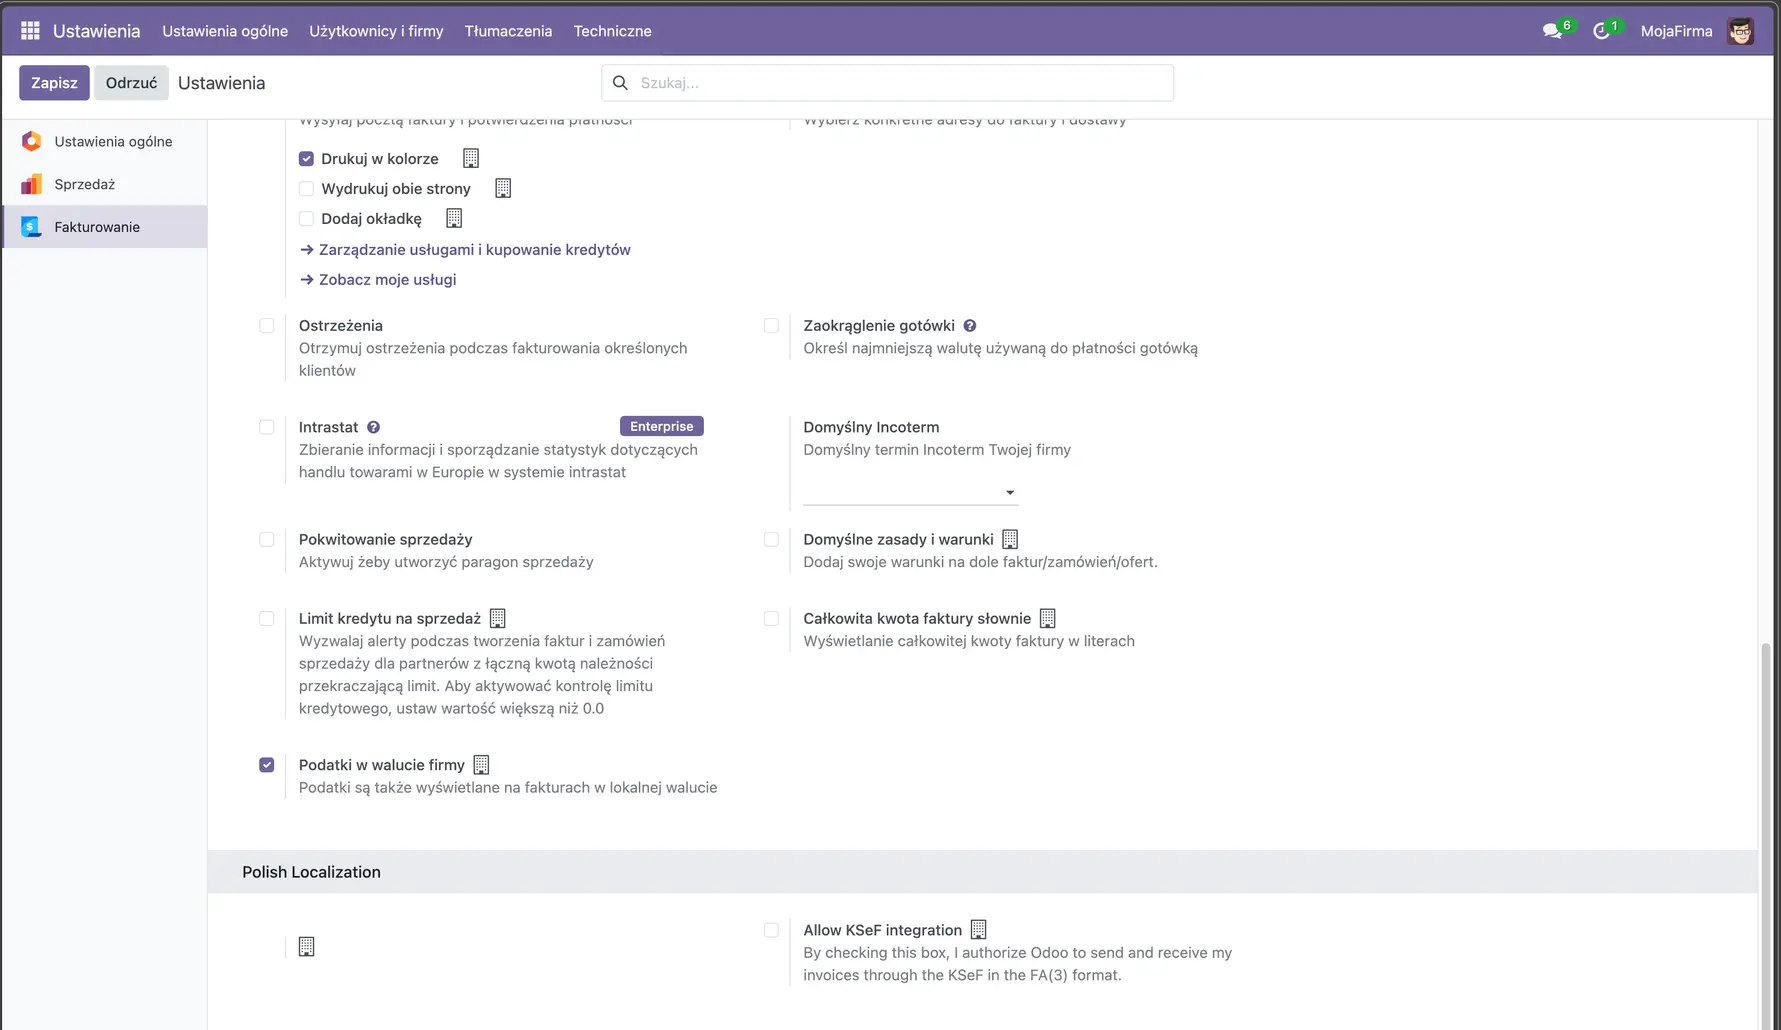
Image 11. View of the KSeF module configuration in Odoo – disabled in this case.
In the "Polish Localization" section shown at the very bottom of Image 11, you will see "Allow KSeF Integration". You must check this box and then select the previously configured certificate.
In this way, you have completed the KSeF configuration in Odoo, and you are ready to send invoices to KSeF directly from Odoo.
By default, the Odoo KSeF module is set to work with the test environment. To switch to the production environment, you must modify a system parameter in Odoo (I will show you how at the end of this article).
Remember to conduct tests on a duplicated database to ensure that invoice numbers are not assigned in your production environment prematurely!
Sending an Invoice from Odoo to KSeF
I will now demonstrate how to send an invoice to KSeF. The process differs very little from the standard workflow. During the invoice creation step, you define everything as usual (it can also be an invoice generated from a sales order).
When you are ready to send the finished invoice from Odoo to the customer, clicking "Send" in the standard dispatch window will now display a field: "by KSeF (e-invoice)".
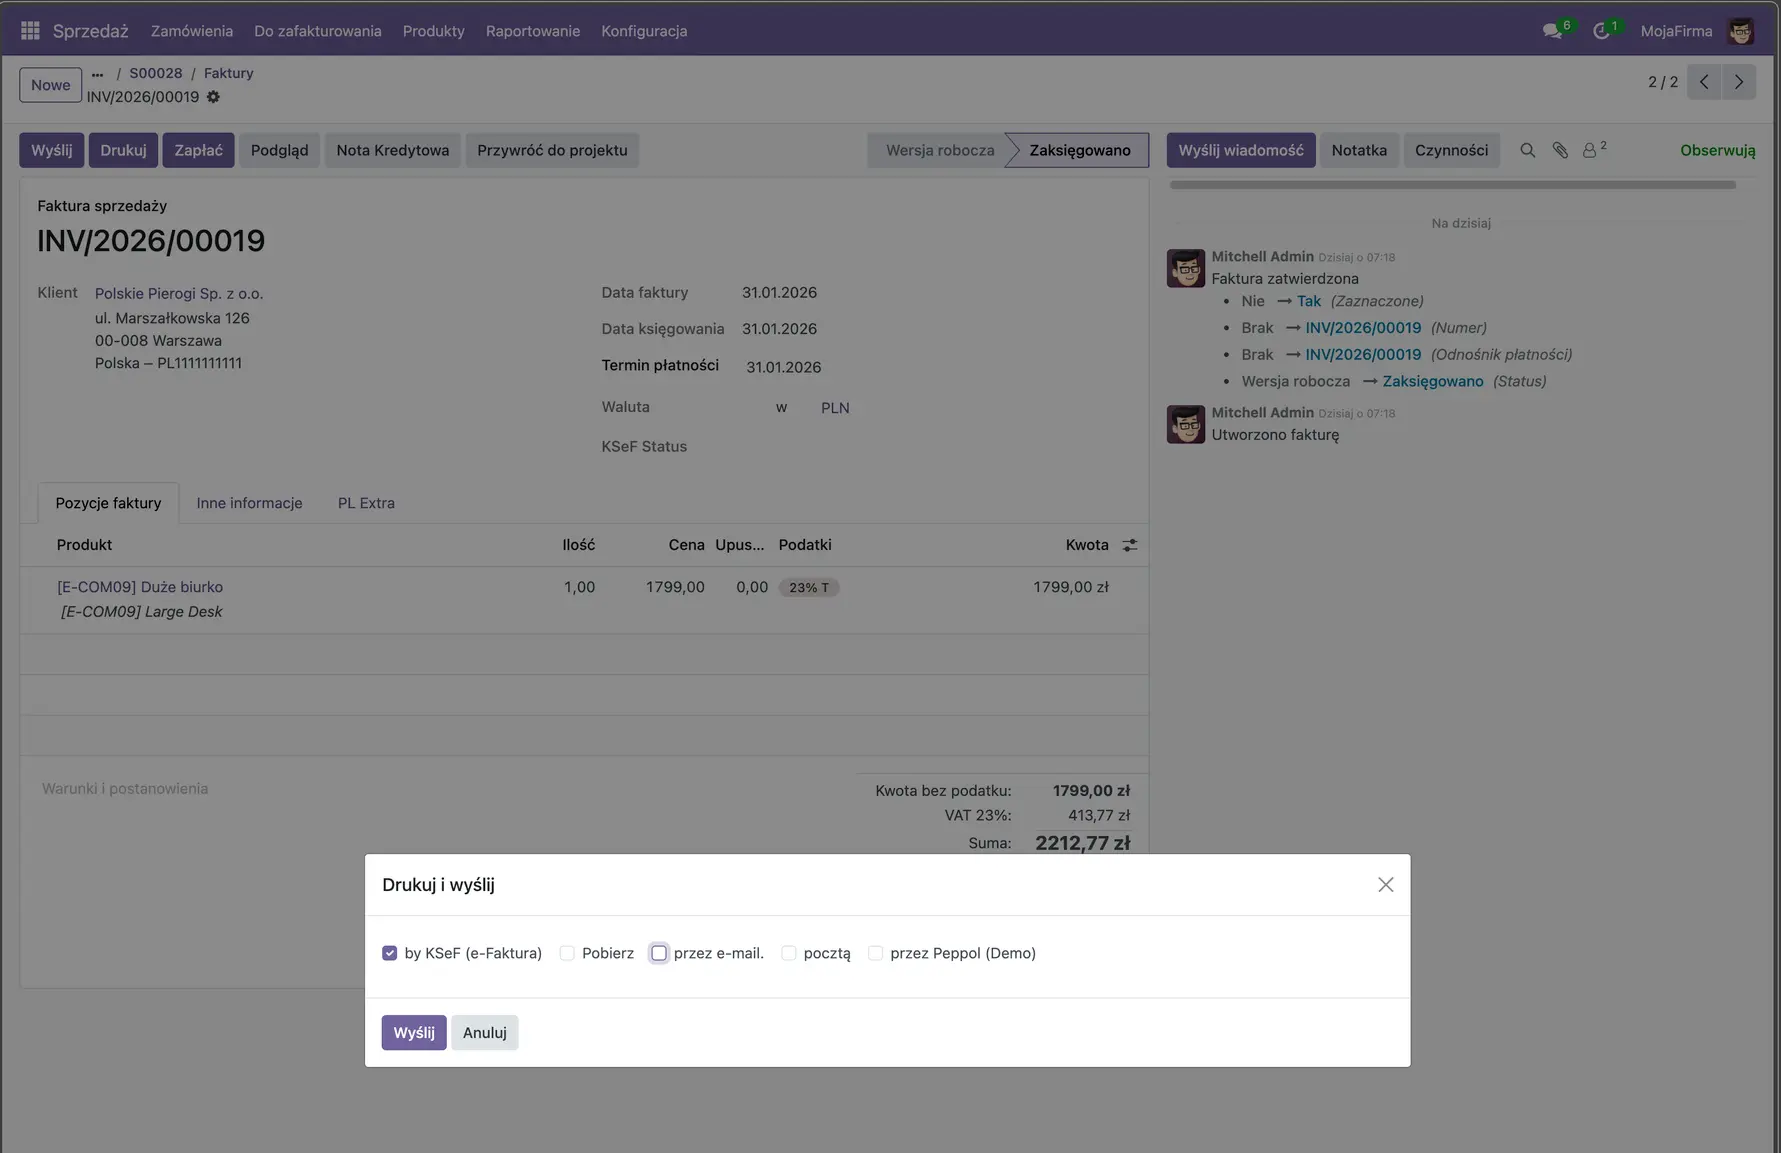
Image 12. Invoice sending view with the option to send the Odoo invoice via KSeF.
Be careful here—you can still send the invoice via email, but the emailed version will differ visually from the KSeF version (it will be the standard Odoo-defined layout). Legally, an invoice transmitted through KSeF is considered officially delivered to the customer.
After sending, you have the option to check the transmission status and, if successful, download the UPO (Official Receipt of Delivery):
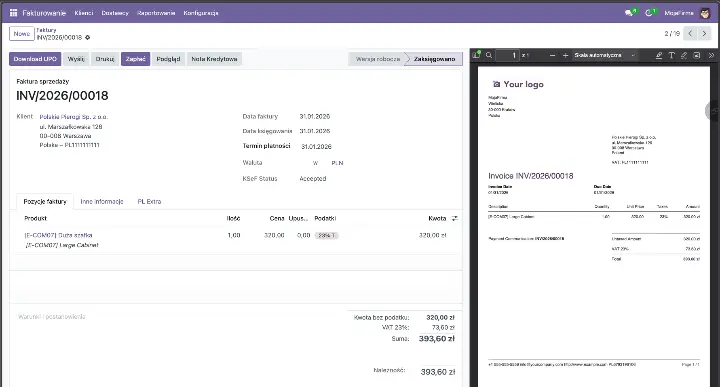
Image 13. Invoice sending view – delivery confirmation from KSeF.
This is how the invoice appears within the KSeF portal:
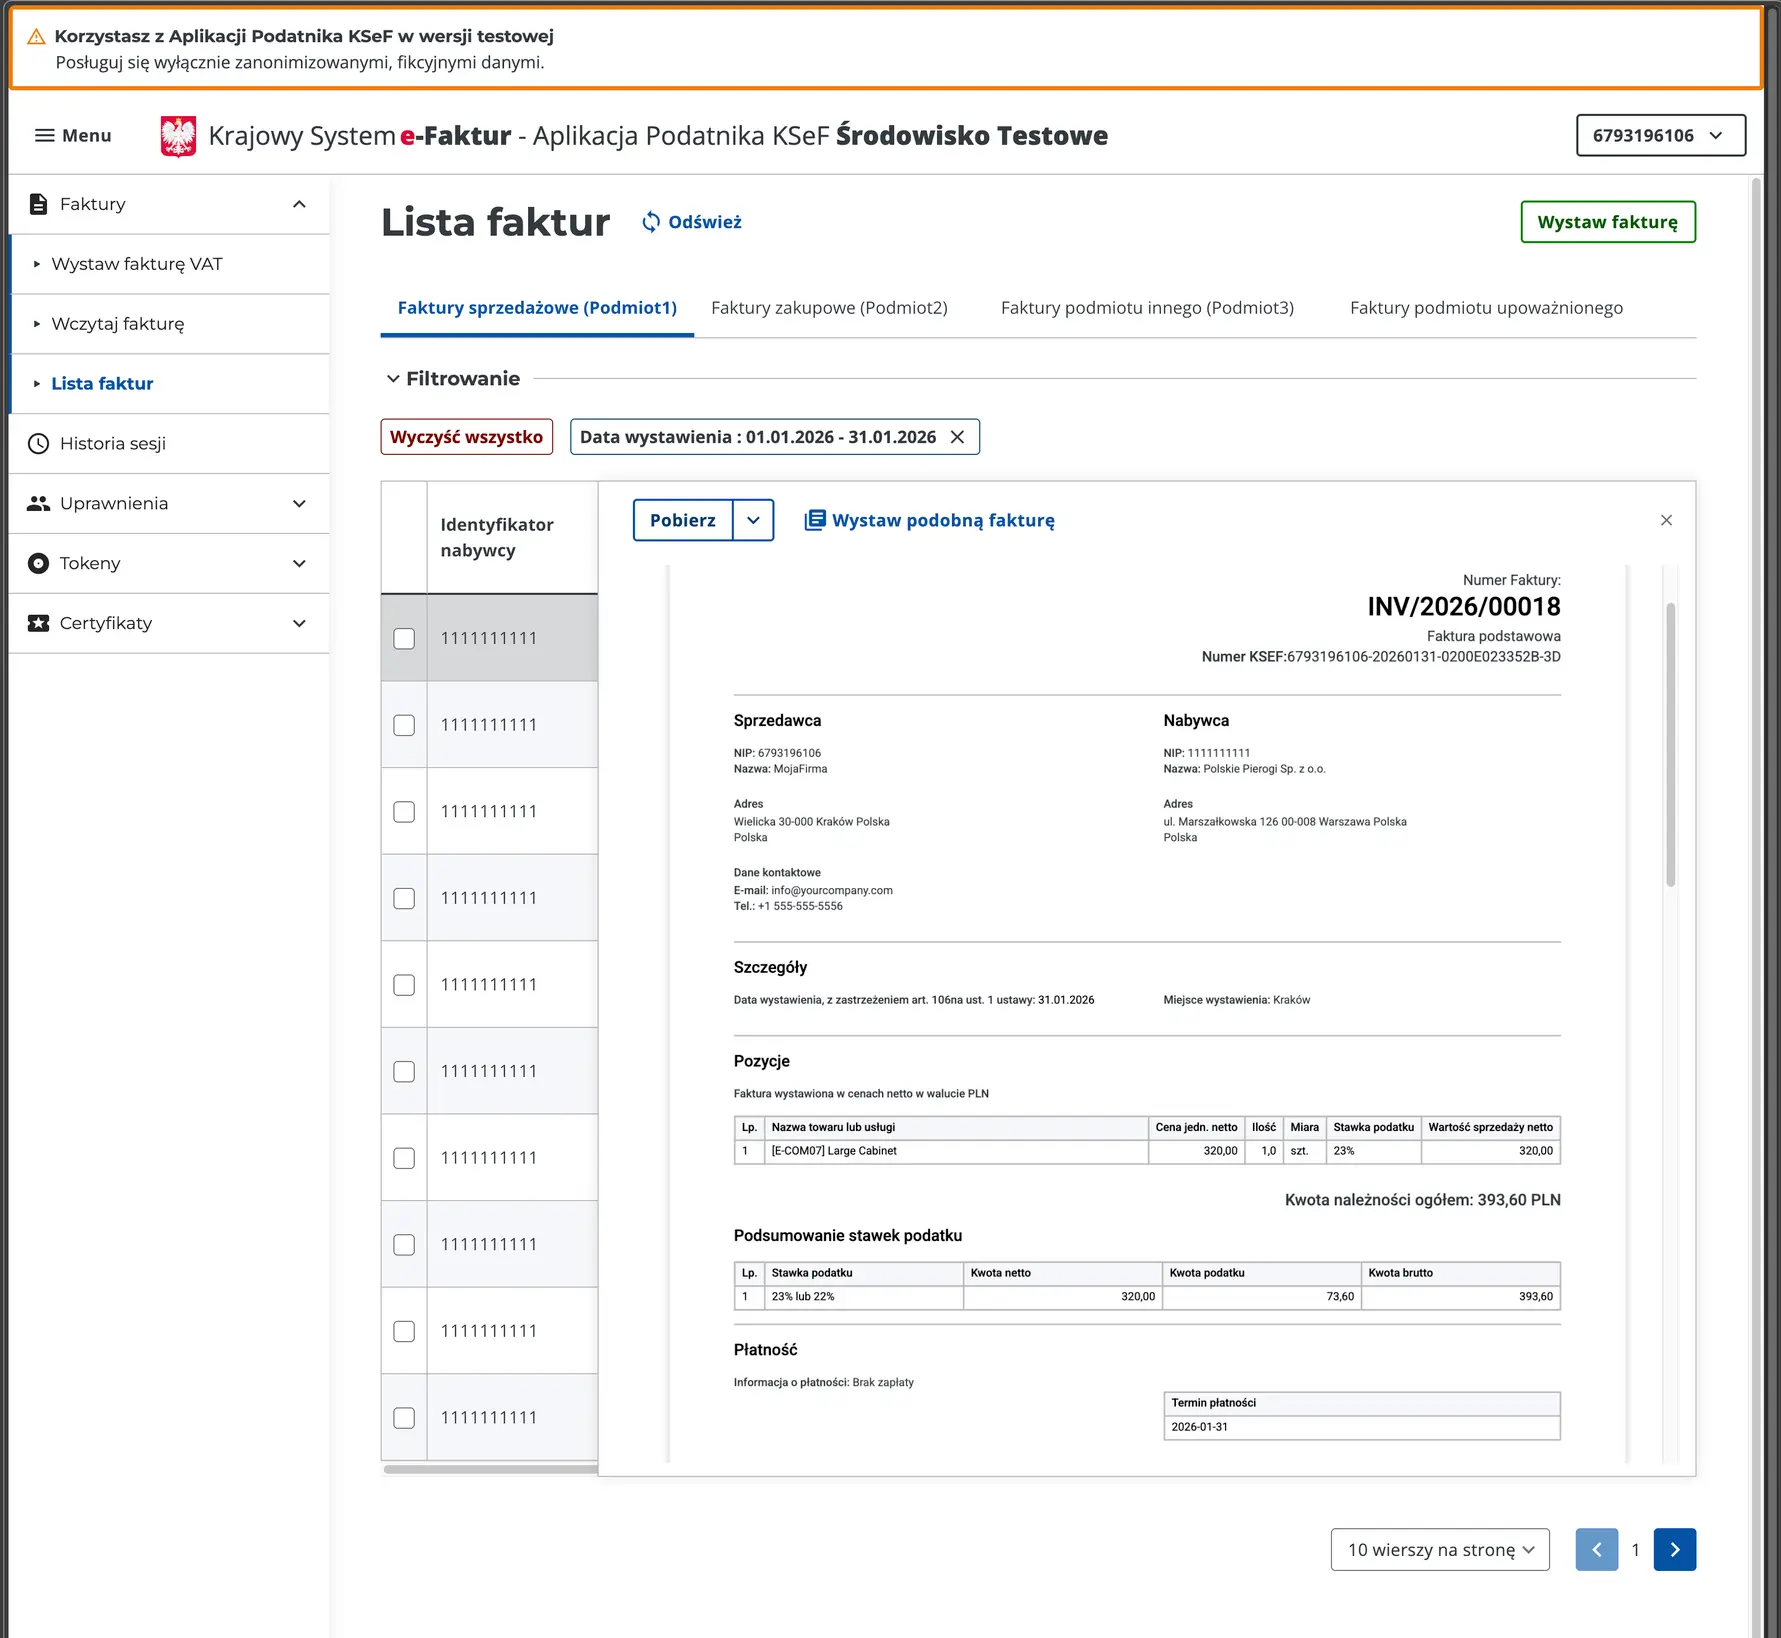
Image 14. View of an invoice sent from Odoo within the KSeF system.
Attention! This may be not fully functioning - test before going to production.
There are known issues with corrective invoices.
Enabling the Production Module
Once you switch to the production environment, all invoices sent will be legally binding.
Ensure that you have thoroughly tested the module on a duplicated database and the test environment before making this change!
To enable invoice transmission to the KSeF production environment, you must change the System Parameter l10n_pl_edi_ksef.mode to "prod". To do this, activate Developer Mode, then go to Settings > Technical > System Parameters and search for l10n_pl_edi_ksef.mode. Change the value from "test" to "prod"..
Crucial: Ensure that the certificate and key have also been updated to the ones generated from the production version of KSeF!
Adapt IT – KSeF Configuration
We offer full KSeF configuration and integration alongside Odoo version upgrades. If you would like to utilize our services, please contact us by phone or via our contact form.